Web Actions
Simple "remote control" for web pages.
Web Actions makes it easy to 'connect' Conductrics to one of your web pages.
You can use Web Actions to do things like:- Test out whether showing a new ad, widget, or part of a page leads to more customer signups.
- Choose between headlines or other content, showing the one that is best targeted toward each visitor.
- Try swapping certain images, learning which image leads to the most sales or conversions.
What's Involved
There are 4 basic steps:
- Create an 'agent' to represent the targeting or test experiment you have in mind.
- Set up what the agent should actually show or do.
- Specify your conversion events, which we call rewards.
Let's take a look at what's involved by walking through the steps.
Heads Up You don't need to know how to program to use Web Actions. But you do need the ability to paste a couple of code snippets into your page's HTML. Familiarity with id or class attributes in web pages is also helpful, but not required.
Step 1
Create an Agent
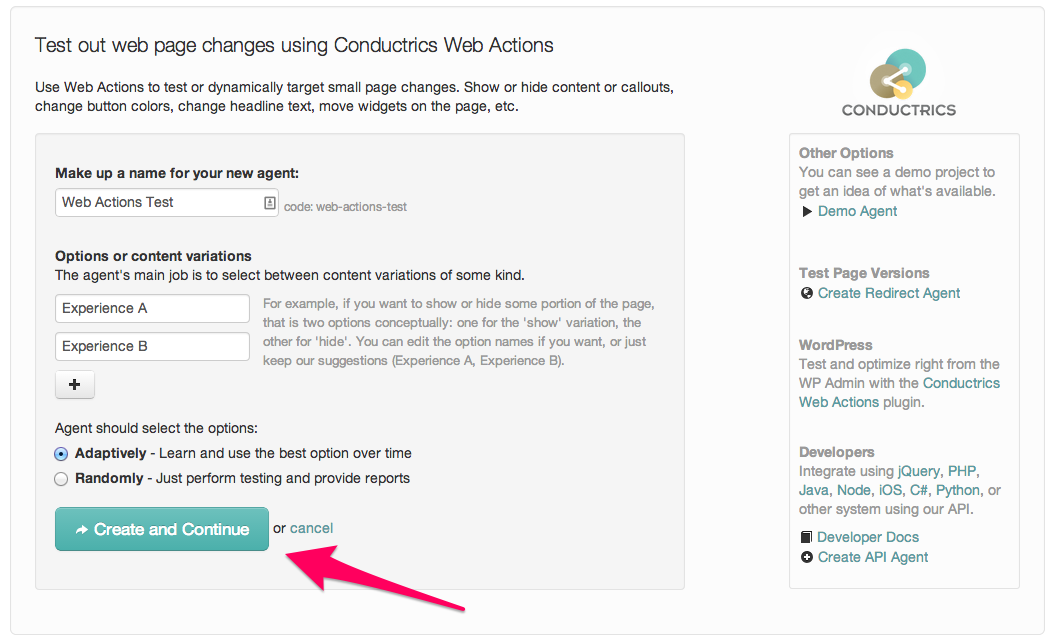
Log into your Conductrics account. You should land at the main 'My Agents' page.
At the top of the page, click Create Agent.
The Create Agent window appears.

Type something like Web Actions Test for the name of your new agent. In real life you might name it something like Home Page Heroes or Black Friday Campaign or whatever is appropriate.
Under Options or content variations, you can just keep the default names of Experience A and Experience B for now. You can change the names later if you wish. In real life you might use better names or add more options, if you wanted 3 or 4 variations instead of 2.
Leave the Adaptively or Randomly option alone for now.
Go ahead and hit Create and Continue.
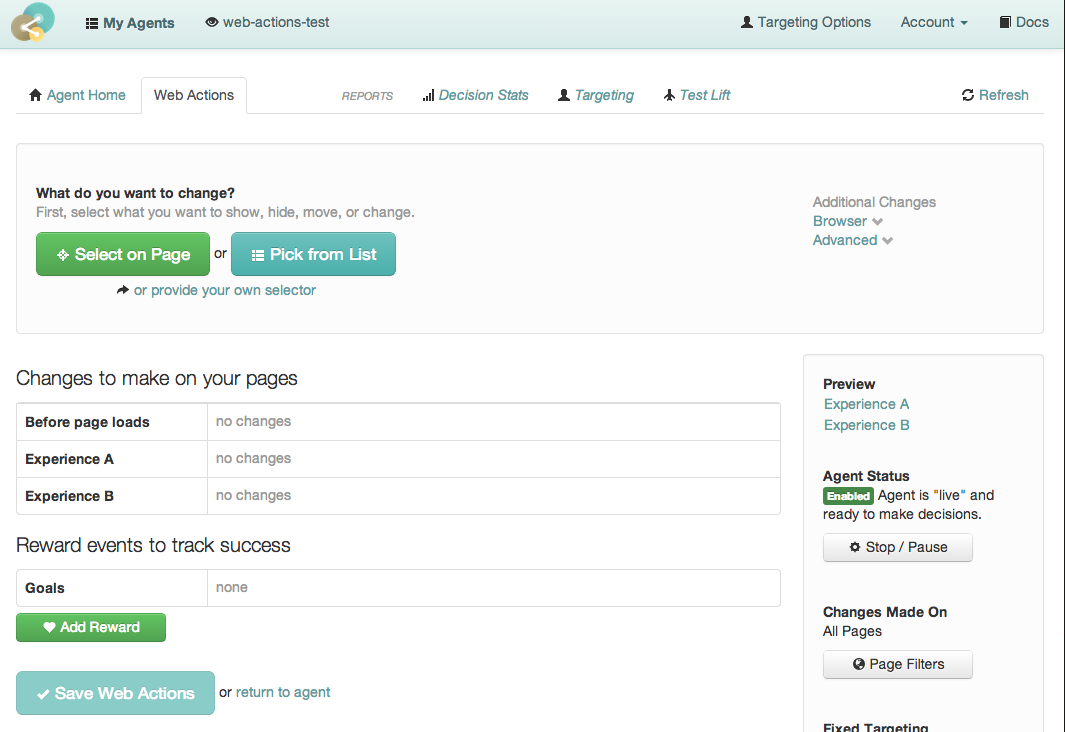
Now you should be in the Web Actions tab for your new agent.
This is your "home base" for setting up what changes should actually be made to your pages for each content variation.
In other words, here's where you say what the difference is between Experience A or Experience B, or whatever your variations are in real life.
Step 2
One-Time Code Paste
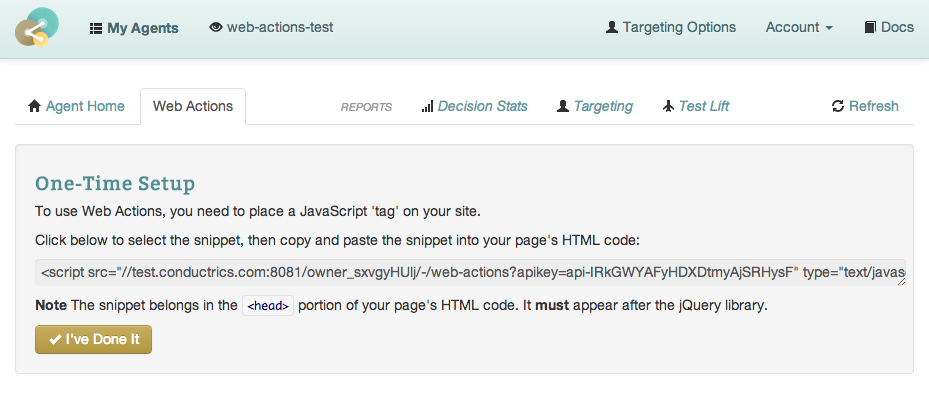
To connect Web Actions to your site, you'll paste a line of code into your HTML. You should only need to do this once.
You should see the One-Time Setup message shown in the screenshot here. If not, look for the Need to See the One-Time Setup Instructions link at the bottom of the page.
Follow the instructions to copy and paste the snippet into the right location in your pages (in the document head). See the Tag Placement Notes for details and answers about where to paste the snippet.
When done, click I've Done It to continue setting things up.
Step 3
Set Up Your Content Variations
Simple Show/Hide Variations
One of the simplest and most sensible things you can do with Web Actions is to show some part of the page to some visitors, and keep it hidden from other visitors.
Let's try that now.
Click the green Select on Page button.
Paste in the URL for one of your pages, and click Go.
Your page appears in a new browser tab. We're showing a sample WordPress page here as a placeholder.

Now it's time to choose the part of your page you'd like to show/hide to different visitors:
Use your mouse to highlight the portion of the page you'd like to show/hide. Your selection will be highlighted in pink.
Click your mouse or hit Enter to keep the selection and return to Conductrics. You can also use the arrow keys on your keyboard to fine-tune the selection, which can be handy depending on how your page is structured.
Note: If you're familiar with jQuery, you can type a selector yourself in the prior step instead of highlighting it visually.

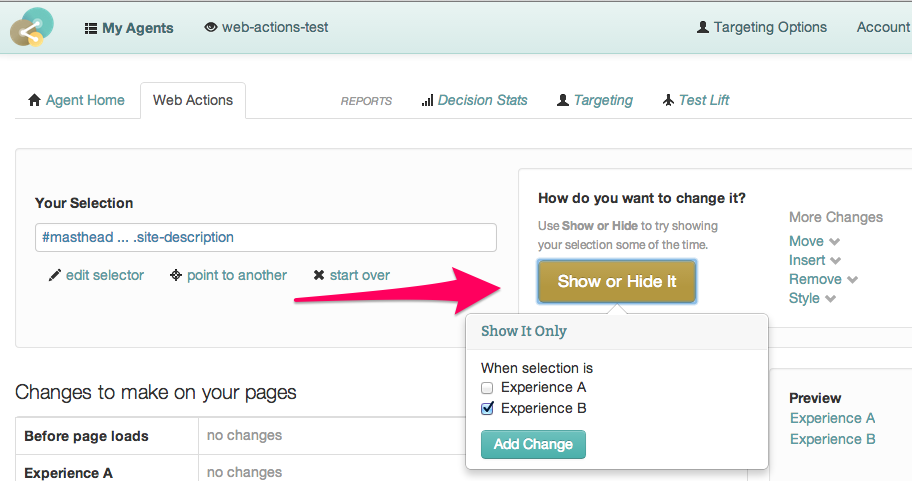
Now you should be back in the Conductrics Console, with your selection summarized at top left.
Click the Show or Hide It button on the right.
In the Show It Only menu that appears, choose Experience A or B as you wish.
The idea is that the page area you seleected is shown only for the content variation(s) that you select in this step, and hidden otherwise.
Now you can review your work.
You'll see that the system plans to hide the portion of the page initially, then show it if the visitor is selected for the Experience B content variation.
Go ahead and hit Save Web Actions at the bottom of the page to keep the changes you've made.

Previewing Your Content Variations
At this point, your test is ready (and is already running).
You might want to preview the different content variations to make sure they are working as you intended.
Go ahead and click the links for Experience A and Experience B, under Preview on the right.
Each preview opens in a new browser tab. Take a look and make sure the changes are working as intended.
If the preview doesn't seem to work, that may mean that you didn't correctly paste the one-time code snippet in to your page's HTML. Please take another look, and contact Conductrics if you have any questions.

Step 4
Set up Rewards
For our content experiment to be complete, we need to set up at least one type of goal reward. This is how the Conductrics system will measure the value of Experience A versus Experience B over time.
Click the green Add Reward button at bottom left.
Fill out the form to establish which visitor interactions should be considered "goals".
In other words, what is important to you? What should be considered a "conversion" for purposes of this little content experiment?
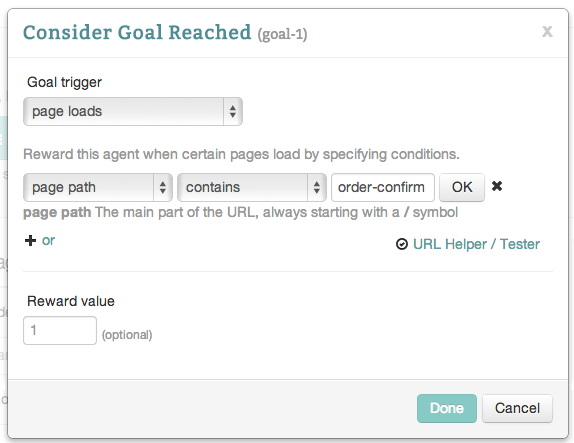
You can set up various types of goal triggers:
Use page loads triggers to reward the agent when the visitor loads a certain page. In the example screenshot shown here, we are rewarding the agent when the user reaches a page that has "order-confirm" in the URL, presumably because that page is a conversion event on this site.
Use user clicks on triggers to reward the agent when the user clicks on a particular link or image or button, etc. You'll be able to point to the button or other element using the visual selector that was discussed above when setting up the content variations. There are also user hovers over and sets focus to triggers which are conceptually similar.
Try it out
If all went well, your web actions test should now be operational.
You should be able to visit the page you added the test to in a browser. Have a friend visit it to on their computer, or try another browser on your computer or smartphone, etc.
At first, the selection of 'a' or 'b' will appear to be random. After your site gets some traffic, it will begin to favor the one that tends to collect the most rewards.
You can also 'pause' your agent at 'a' or 'b' to make it easier to make sure everything is working. Just hit Stop/Pause Agent in the right sidebar, then use the window that appears to pause the agent at Experience B or whatever you want, then visit your test page with any web browser.
If, after you've played around for a while, you'll likely have some 'junk' data in the reports that isn't meaningful (because it was you testing things out). You can 'reset' your agent's data, which will clear out all your reports. Go to the agent's Home tab, then choose Reset Data in the sidebar.
Additional Topics
There are a few additional Web Actions features that we haven't discussed yet.
Using Fixed Targeting Rules
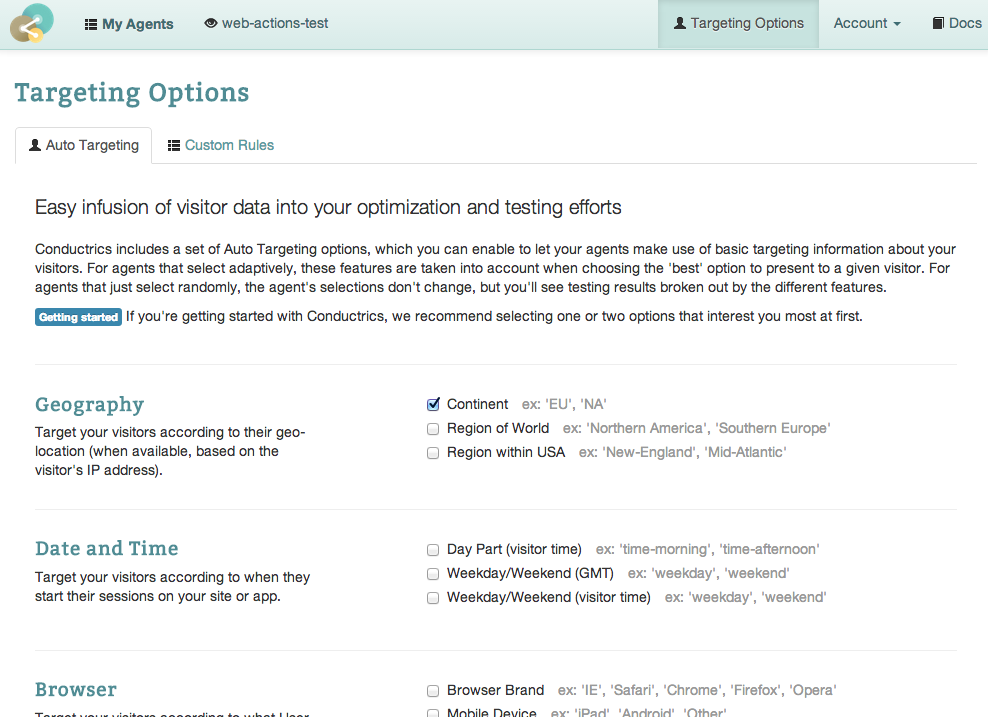
You can use Fixed Targeting to target certain content variations at particular visitors.
First, enable Conductrics auto-targeting for your agent:
Click Targeting Options in the main navigation at top right.
Enable one or more Auto Targeting options, such as Region of World, Weekday/Weekend, or one of the USA Census options such as income or population density, etc.
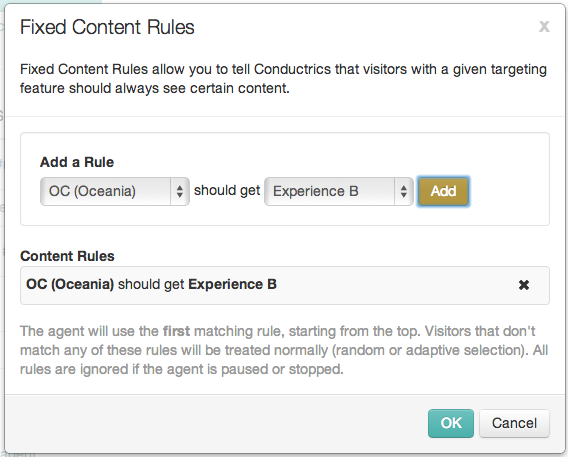
Then, back at the Web Actions tab for your agent:
Hit the Content Rules button in the right sidebar.
Use Fixed Content Rules dialog that appears to make up as many rules as you wish, assigning Experience A or Experience B to whatever types of visitors are appropriate.
There's more to Conductrics Targeting than just these simple options. For instance, you can create custom targeting rules based on your own data. See Using Targeting for more.
Page Filters
The example we walked through above is appropriate for all pages on the site because it's modifying something in the header that appears on all pages.
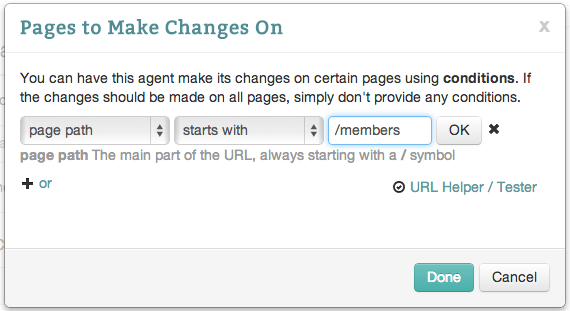
If you want to make changes on certain pages only, you can use Page Filters to apply the changes only where appropriate.
Click the Page Filters button in the right sidebar.
Specify which pages the changes should (or should not) be made on using the simple options provided. For instance, the screenshot shown here would enable the web actions for this agent in the
/membersportion of the site.You can use the URL Helper / Tester link to test out whether the filters will match the pages you want.
Getting to Know the Types of Web Actions Available
In the instructions above, we explained how to set up simple show/hide variations for a page.
Now let's take a closer look at the different types of actions that are available.
Show and Hide - You have already seen how these work in the steps discussed above.
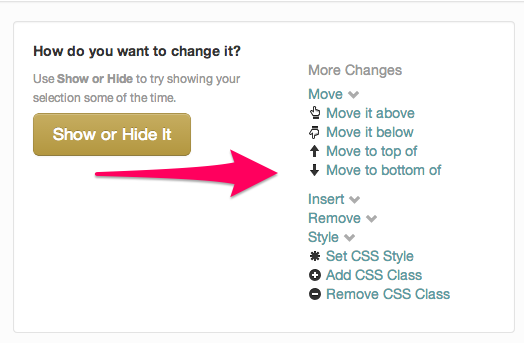
Move Actions - These actions allow you to move some portion of the page to a different location. Typically this is used to rearrange the elements in a sidebar, or to try moving a form to a different location, etc. You have a choice of Move it above, Move it below, Move to top of, and Move to bottom of.
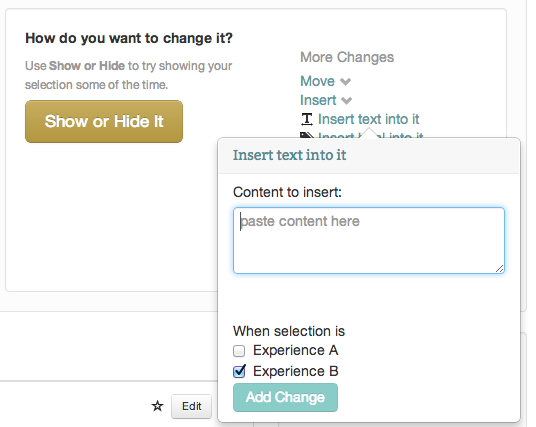
Insert Actions - These actions allow you to add new content to some portion of a page. You have Insert text into it which can be used to change the text of a link, paragraph, or some other part of the page. You can also use Insert HTML into it if you have some markup that you'd like to add to the page when the visitor is selected for a particular content variation. You can also use Set its form value to try prepopulating a form element with a particular value.
Remove Actions - These actions allow you to completely empty or remove a portion of the page. You could then insert new content using one of the Insert Actions described above.
Style Actions - If you know a bit about CSS styles, you can use the Set CSS Style, Add CSS Class, or Remove CSS Class actions to change the coloring, padding, margins, or other aspects of a page's visual style.
Redirect Actions - The Redirect to page action can be used to redirect some visitors to a completely different page. Similarly, your can easily try different versions of an image using the Swap images action.
Advanced Actions - If the content variation you have in mind involves including a bit of custom JavaScript or CSS code, you can do that using the Include script or Include CSS Code actions, respectively.
Tag Placement Notes
The 'One-Time Code Paste' instructions tell you to:
- Place the web-action script tag in the
headportion of the page - Place it after jQuery
The reason we ask that the script tag be placed in the head is so that we have an opportunity to 'pre-hide' any elements that you might be making changes to via your Web Actions agents. For instance, if you have an agent that is showing a widget to some visitors but not others, we need a few milliseconds to make that decision, and if we're in the head portion of the page, we can make sure that the widget is pre-hidden during that process. This keeps the widget from appearing for a few milliseconds and then disaappearing, other similar 'flickering' type scenarios that generally lead to bad user experiences.
Q: What if I can't place the Conductrics script tag after jQuery?A: Sometimes it isn't possible to ensure that the Conductrics web-actions script tag appears after jQuery. If you can place the Conductrics tag in the head portion of the page, but can't specify that it gets loaded before jQuery, the Conductrics code will automatically 'wait' for jQuery to load and things should work normally from there.
A: Sometimes a site has been built and tested with jQuery at the bottom of the page (often to speed rendering). You should still put the Conductrics script in the head portion of the page. It will do the initial 'pre-hiding' right away, then wait for jQuery to load to proceed with whatever actual changes are called for by your Conductrics agents (if any).
head part of the page at all?A: Sometimes it isn't feasible to place our script tag in the head because of the page or system architecture. In such a case, you can use an alternate implementation style, which places an external stylesheet in the head to do the 'pre-hiding':
- In the
headportion of the page, add a stylesheet reference that looks like this, substituting the 'xxxxx' parts with the appropriate information from the Account Access page in your own Conductrics account: - At the bottom of the page, preferably after jQuery, place the normal script tag provided by the 'One-Time Code Paste' instructions.
<link rel="stylesheet" type="text/css" href="//api.conductrics.com/xxxxx/-/web-actions-css?apikey=api-xxxxx">