Targeting and Targeting Rules
Automatic assignment of targeting features or segments to your agent sessions
Conductrics provides a Targeting Rules feature which allows your agent to 'tag' sessions with targeting features or segments that you define.
The targeting rules can be based on data such as:
- Geo-location data such as country or region
- When the session occurs, such as the day of the week, or time of day
- Referring-page information such as search terms or referring domain
- User-agent data such as browser type or whether the session is on a mobile device
- Other information that you pass along when you use our API to make decisions
Targeting Features and Segments
Two ways to 'tag' your visitor sessions with targeting information
The Conductrics service allows you to think about Targeting in two ways:
Targeting Segments
Each visitor can be "bucketed" into one of several segments that you specify. By definition, no visitor can be in more than one of these buckets at once.
As your agent makes decisions and learns from the rewards it gets from goal events, it keeps its learning "bucketed" as well. To make the "best" decision for a particular user, your agent uses its learning for the corresponding user segment.
Targeting Features
Each visitor can be "tagged" with any number of separate features that you define. These attributes might represent notions such as income or what time of day a users visit took place.
As mPath runs, it learns about the features separately. To make a decision for a particular user, your agent uses its learning for that user's features, intelligently blended.
So, the main difference is that a given visitor belongs to just one segment at any given time, but could have many features.
Creating Targeting Rules
Again, the Conductrics service comes with configurable Targeting Rules which allow you to "tag" or "bucket" your visitors according to geo-location, day of week, time of day, referring page or user agent data, and more.
To create a new targeting rule, go to the Targeting Rules page in the Conductrics Console and hit the New Targeting Rule button.
You'll be presented with a relatively simple form:
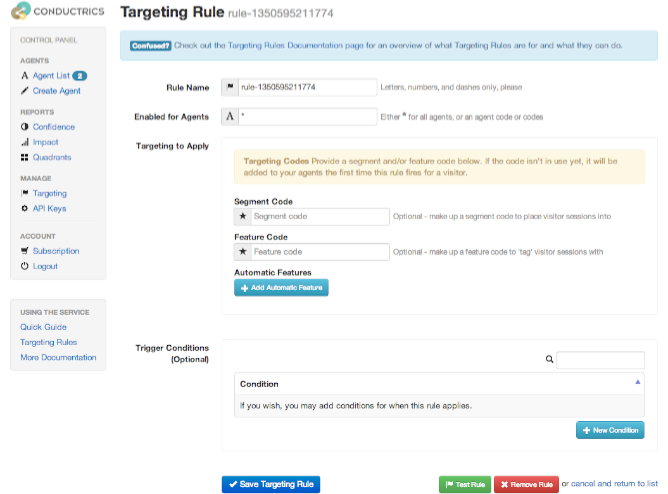
Here's what you provide in the form to create a new rule:
- A name for the rule.
An auto-generated name will be made up for you, but it's best to provide your own that has more meaning. - The agent(s) that you want the rule to affect.
The default is a * which means apply to all of your agents--including ones you create in the future. Alternatively, you can provide a specific agent code, or a list of agent codes, separated by commas. A segment or feature code to apply, or one or more Automatic Features.
You can provide a segment or feature code to tag your visitors with. Generally, you would also provide one or more Trigger Conditions (discussed next) so that the feature or segment is applied when certain conditions are met (for instance, when users are coming from a particular place, or during a period during the day or week).Alternatively, can also choose one or more Automatic Features, for instance automatically tagging users that are visiting from 'High Income' areas, based on geo-location. Use the Add Automatic Feature button, then pick the automatic feature you're interested in.
Optionally, one or more Trigger Conditions.
Use Trigger Conditions along with your own feature or segment code to cause our service to apply the feature or segment when certain conditions are met (for instance, when users are coming from a particular place, or during a period during the day or week).You can provide as many conditions as you wish, described in more detail below. Click the New Condition button to start adding the first one. When you request decisions from our service in the future, the Trigger Conditions will be evaluated for each visitor session. Whenever a decision is requested for a session that meets all of the trigger conditions, the session will be automatically 'tagged' with the given feature, or 'bucketed' into the given segment automatically.
About Trigger Conditions
You need to provide at least one trigger condition. When you click the New Condition button, you'll see this dialog:
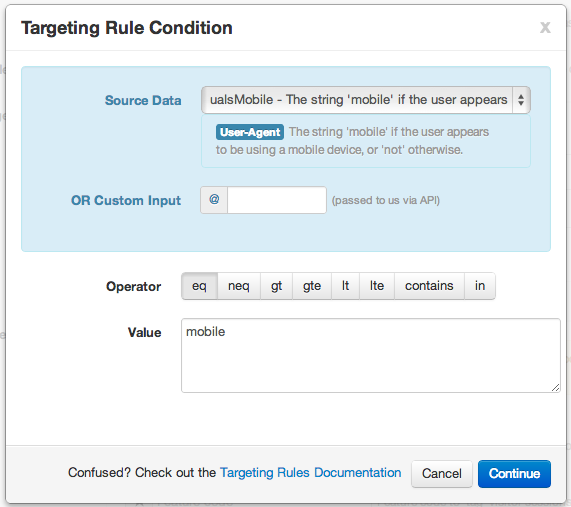
For each trigger condition, you need to specify:
- The Source Data you want to provide a condition for.
The available types of built-in source data are provided in the drop-down. Contextual help is provided in the dialog for the selected source data. The same descriptions are available in our Condition Reference.Alternatively, you can specify your own Custom Input data. Custom inputs start with @, and are passed to the Conductrics service when you ask it for decisions. For instance, if you have purchase history available for your users on your side, you could make up an input called @total that represents how much the user has purchased from you in the past. You would type total in the 'Custom Input' field shown in the dialog above, and you would pass a URL parameter called @total when making decisions.
- An operator.
The operator specifies how you want to match against the source data. Here are the options:eq - equal, meaning you want the trigger to be considered met when the Source Data is the same as the Value you provide.
neq - not equal, trigger is considered met whenever the Source Data is not the same as the Value you provide.
gt, lt, gte, lte - for less than, greater than, less than or equal to, and greater than or equal to, respectively.
contains - trigger considered met if the Value you provide is found in the Source Data (substring comparison).
in - trigger considered met if the Source Data is one of several values you provide in a list.
- A Value to compare the source data to.
Provide a number for most of the date- and time-related source data types.
Putting it Together
As an example, you might use source data locHourOfDay, operator gte and value 12 if you wanted a condition that triggers whenever a decision is made for a visitor after noon (any day of the week). You might add a second condition locWeekPart eq weekend if you wanted a condition that triggers after noon on weekends only.
Creating Targeting Rules Programmatically It's also possible to create targeting rules via our Targeting Rules API, if you want them to be created programmatically or via a user interface of your own devising. Our web-based rules editor (shown above) uses this API internally.
For when you want your own code to decide who gets what segment or feature
Sometimes you will already have your own segment or targeting information that you want to pass to our service.For instance, your app requires people to register or sign in, you might have some demographic information, or know whether they are in your "big spenders" segment, or what their content preferences are.
In such a case, you can pass segment or feature(s) codes expliclitly when you get decisions from your agents.
For example, here is an example decision call from the Quick Guide:
GET http://api.conductrics.com/acme/agent-1/decision
To pass a segment to our service, just add a parameter called segment along with the decision call. The segment code you pass can be anything you want (as long as you use numbers, letters, and hyphens only). Let's say you know that a visitor is a registered user, perhaps via a cookie or database lookup that you already do on your side:
GET http://api.conductrics.com/acme/agent-1/decision?segment=registered-user
Likewise, you can pass feature information as a parameter called features. Use commas if there is more than one feature to pass. For instance, if you have data on your side that shows the visitor has a history of viewing articles about cats and celebrities:
GET http://api.conductrics.com/acme/agent-1/decision?features=subj:cats,subj:celebrities
Each of your feature codes should have two parts: a type and a value. Separate multiple feature codes with commas.
For instance, you might pass something like features=genre:jazz to "tag" if you have info on your side about the visitor being interested in jazz music.
If the visitor has multiple music interests, you might pass something like features=genre:jazz,genre:rock when calling the API.
If you also know the visitor is female, you might use features=genre:jazz,genre:rock,gender:female or similar.
If you don't provide a type for a particular feature, Conductrics will use custom internally. In other words, passing features=hiking is the same as passing features=custom:hiking.
We recommend that you always provide a type if possible for clarity.
If you prefer, you can use a HTTP header called x-mpath-segment or x-mpath-features rather than the segment or feature URL parameters, respectively. Sometimes that's easier or more appropriate, depending on how your site or app is built.
Using Targeting Rules and Explicit Passing Together
It's totally fine to use targeting rules and also pass segment/feature information.
Segments: If a segment is assigned via a targeting rule, and a different segment is passed explicitly via the API parameter, the explicitly-passed one will take precedence.
Features: If some features are assigned via a targeting rule, and some features are also passed explicitly via the API parameter, the session will be tagged with all of them (the superset).